
If you’ve started doing family history interviews or writing stories using audio files, you need a reliable speech-to-text tool to digitize those stories. The written word is timeless. Using transcription tools can transform those priceless voices to treasured journals, books and more. oTranscribe may be the program to help you get it done because it mimics the benefits of old foot-pedal dictation machines using your browser and keystrokes. Here at Evalogue.Life, we’ve done thousands of hours of both interview and transcription work, so we’ve worked with a variety of transcription and voice recognition tools. Here’s a quick review of the features and functionality of one of our favorites, oTranscribe.
Related: Review of several transcribing and voice recognition tools
oTranscribe is Free and Easy
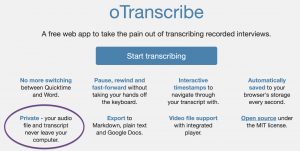
To begin with, you can’t beat the price. oTranscribe is free and easy to access on your computer or tablet. It’s open source software created by the MuckRock foundation that funds free tools to help journalists, researchers and citizens.
Simply search for the program or use this link, and you’ll soon have this powerful program at your fingertips. At first glance, you’ll notice that the service has a clean, no-nonsense look. Here’s a screenshot from a recent transcription to give you an idea:
 Slick Features
There’s a button to upload your audio file into the interface (read below about why it’s secure) and a notepad to start typing. But don’t let its simple setup fool you. There are several convenient features and shortcuts which make this a slick app for the at-home transcriptionist.
The ESC key works as both a pause and play button. This makes it easy to stop and start listening while you type and reread your text. When you do push play after pausing, oTranscribe automatically rewinds a couple of seconds. This feature is a big timesaver.
The time stamp feature (Control + J) also makes for easier editing. If you find yourself unable to hear a part of your audio clearly, you can insert a reminder of the time in your transcription to help you come back to it later. I’ve found this helpful when I’ve been stuck trying to understand a phrase and wanted to move forward transcribing, yet didn’t want to forget where I needed to come back to revisit text.
Another handy feature of oTranscribe is the ability to slow down or speed up audio. Listening to audio a bit slower often lets me understand the conversations better, helping me keep up when I type. I find myself maintaining a great rhythm of listening and typing with a slightly slower audio, a benefit unique to oTranscribe.
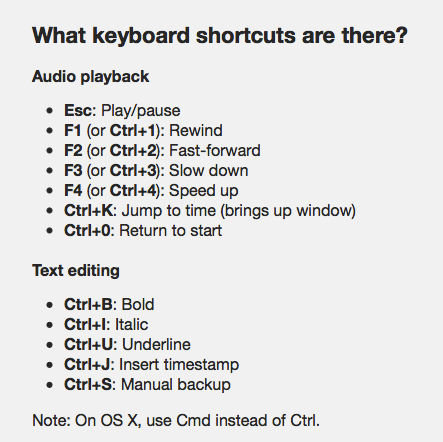
Keyboard Shortcuts
Other shortcuts, such as F1 and F2, let you move forward or backward a few seconds at a time. Having done transcriptions by playing the audio file straight from my computer and typing directly into a word processing program, I can say without a doubt that oTranscibe’s shortcuts save loads of time. I don’t lose my place by trying to scroll across a bar because the quick key options are very accurate. With a couple of clicks, I’m exactly where I want to be in the audio instead of lost in the recording, trying to rediscover my place. You can even create your own shortcuts!
Finally, though the audio isn’t necessarily saved in the program, the text is usually saved automatically. If you lost power on your device for any reason, when you turned it back on and went to oTranscribe’s website you would most likely find all of your typed work backed up. That’s a fantastic bonus to an already very helpful program.
From our use, it seemed like the Safari web browser saved the audio file when the program was closed and reopened as long as cookies weren’t deleted. However, when we used oTranscribe in Google and closed and reopened the program, the audio had to be uploaded again. Either way, though, the typed text was usually still there. We did find that if we had several hours of transcriptions typed up, eventually the program would delete older backups. For this reason, as you go along you might want to back up your work. Once you’re done transcribing your file, simply copy and paste it into your preferred word processing program.
Related: 12 Audio Tools for Family History Writers
Privacy – oTranscribe does not upload your file to their server
Another reason that oTranscribe is a great option is that you are not uploading your files to their server. You are using their interface, but the files reside on their browser. Privacy may be a concern with people sending files to transcription services or uploading to speech-recognition programs that reside who-knows-where.
After Using oTranscribe, I Will Never Go Back!
Now that I’ve done transcription work using oTranscribe, there’s no way I would play an audio file from my computer and attempt transcribing without its help. Overall, the variable playback speeds, time stamp feature, and automatic text saving have made too big a difference in my work flow and accuracy. When you’re replaying sound clips for hours, the ease of clicking a few keys as you navigate tracks makes a world of difference. The tools oTranscribe offers are customized for transcriptionists and practically essential in this modern age of storytelling. If you’re thinking of turning oral history interviews into text, don’t hesitate to give oTranscribe a try. It will make one of the most tedious parts of the process much easier.

Disclaimer: We are part of the Amazon Affiliate program and may receive a commission if you buy products we recommend. It helps us keep the lights on! Thanks!
By Eva Barnett, Evalogue.Life administrative assistant and staff writer.