

Here is a collection of tips, best practices, and “writing a book templates” if you are writing a book, especially for the interior layout part. You want your book to look clean, beautiful, and not scream “self published.” It’s not rocket science, and little choices add up to a big difference. These tips will benefit you anytime you are writing a book and need a template for a printed project.
This article has two main parts:
- Best practices to format biography, memoir, life story, or family history books. Think of it as a layout checklist.
- Writing a book templates – these include a template for: (1) the story spine and emotional structure to engage readers and hit all the right emotional beats and (2) A book layout template for Microsoft Word.
First, decide whether to lay it out yourself using our writing a book template or to hire a professional
Your first decision is to decide whether the interior layout is a DIY project or if you should hire it out. With new software and templates, you can totally do this yourself. That said, do consider finding a professional if you have a little budget because I’ve learned the hard way that packaging a book for press can take a crazy amount of time. Professionals know how your book should look, and there is more to interior layout than you might think. If you need someone to lay out your book, submit a message to me via the contact form on our website here. I have some contacts. For example, one of my clients just had a professional I know do the cover design and layout of his book, and it turned out gorgeous.
Don’t make amateur mistakes on your book interior layout – follow these best practices
This is not a comprehensive list, but below are some pro tips for book layouts that look professional and not self-published. There are hyperlinks embedded so you can learn more each of these topics.
Related article: How to write an autobiography, an A-Z primer of the process
Formatting you should set up during the work-in-process (writing) phase:
This part of the checklist includes items to set up on the front end while you are writing your book. Why does that matter? Because it will save time and money later if you take a few minutes to change settings in your file early on.
Note that I write in Microsoft Word, so these screen shots apply to Word. (Keep reading below this section for formatting to put in place after you’ve written and when you create the actual layout.)
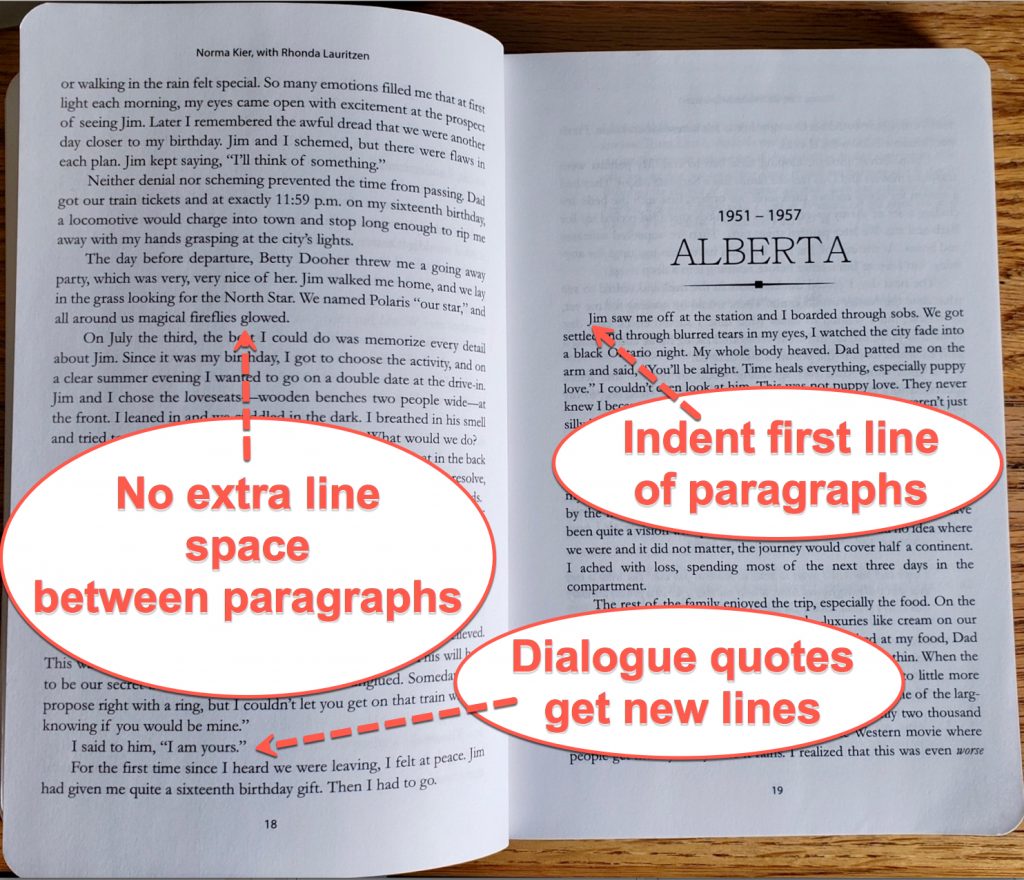
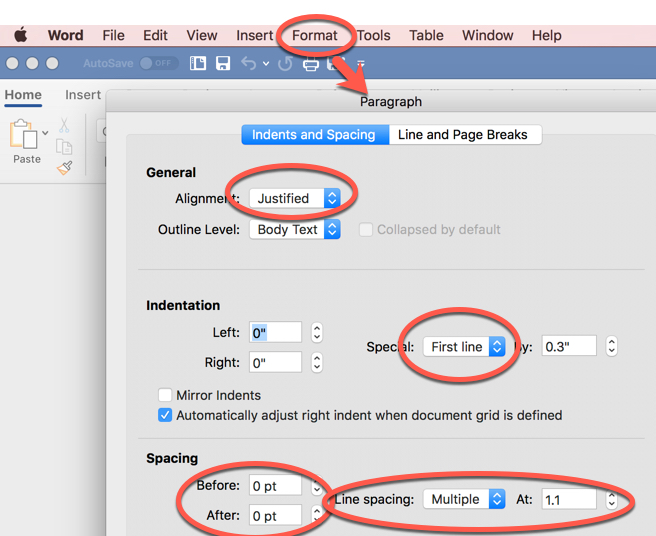
- No extra lines between paragraphs: Click here for a great article on how to seize control over the spacing between paragraphs.
- Indent each paragraph: I prefer 0.3″ or 0.5″ in a final book. Note that after originally writing this article, I have learned that in professionally produced books, the first paragraph of a new chapter or new section after a subheader are NOT indented.
- Auto indentation: Set up the paragraph formatting options so each paragraph automatically indents, rather than using the tab key. This matters because if you manually insert tabs, then create an ebook, you have to remove them all manually. Click here to read how to indent paragraphs in Word. It’s slick and easy to do it once.
- Dialogue on its own line. Each line of dialogue should appear on its own line. Click here for an article about formatting dialogue.
- Italicize a person’s thoughts or put them in quotes? There is no hard-and-fast rule about this, but my stylistic preference is to italicize thoughts. The important thing is to decide up front and be consistent. Here is an article with more discussion of pros and cons.
- Only one space after sentences: Most of the world has received the memo by now that there are no longer two spaces after sentences. However, if you’re still hard-wired to add two, my recommendation is to do a universal “find and replace” at the end of your project and fix it that way.
Below is a photo showing the settings I select in Microsoft Word, in the “Paragraph” dialogue box:
Choose software for creating the actual book layout:
Once your book is written and edited, you move onto creating the actual layout.
My recommendation is to NOT do this in Microsoft Word. It’s a big hassle for printers for myriad reasons, including the fact that Word generates text in RGB format, while printers use CMYK so black text may not export as black. The solution is to use software especially for print layout. Professionals use programs like Adobe InDesign (the gold standard) but there are now great free software options through book publishers. Here are three options to consider:
- Blurb BookWright: I have used Blurb to print single copies of hardbound books. Blurb also has free BookWright software you can download for creating your layout, which gives you the option to upload to Blurb for free for printing, or to export in a print-read PDF for $5. (Check for current pricing.) Click here to explore Blurb BookWright.
- Kindle Create: Free software by Amazon for creating your layout. Click here to explore Kindle Create.
- Apple Pages: This is fabulous software that comes installed for free on Mac computers and other Apple devices. It is easy to use and export professional layouts.
- Affinity: Thisis software like Adobe InDesign but without Adobe’s subscription model.
- Adobe InDesign: This is industry-standard for professional book designers. It is robust but expensive and comes with a steep learning curve. It is not recommended unless you have experience and plan to regularly do this type of work. I’ve had years of prior desktop publishing experience and have used InDesign to create some books in recent years and vowed “never again.” It was far too time consuming and the results were sub-par. I will hire a professional instead.
- Canva: This web-based app has been a game changer for me doing design work of all types from slide decks to PDFs, to social media graphics, to graphics inserted into books. If you don’t have an account, do yourself a favor and get one today. Their free accounts are terrific, and I consider my paid account one of the most essential tool in my kit.
- Photo book makers: If you’re making a short book with photos, consider using one of the scrapbook makers. I’ve had good results with Shutterfly, and I know other people use Walgreens and others. The price per book is high, but their templates are pretty, the software is online, and the tools are geared toward beginners.
- Here is a good article I found that reviews a list of software options for designing a book interior layout. It does a deeper dive on the actual software tools than I cover in this article.
Formatting to set up after writing, i.e., when you create the actual interior layout:
Okay, now that you have decided which tool to use to create your layout, here is a checklist of formatting choices that will make your final book look professional. Keep in mind that most of the photos below show how to set up the options in Microsoft Word, even though I am NOT recommending you create your final layout in Word.
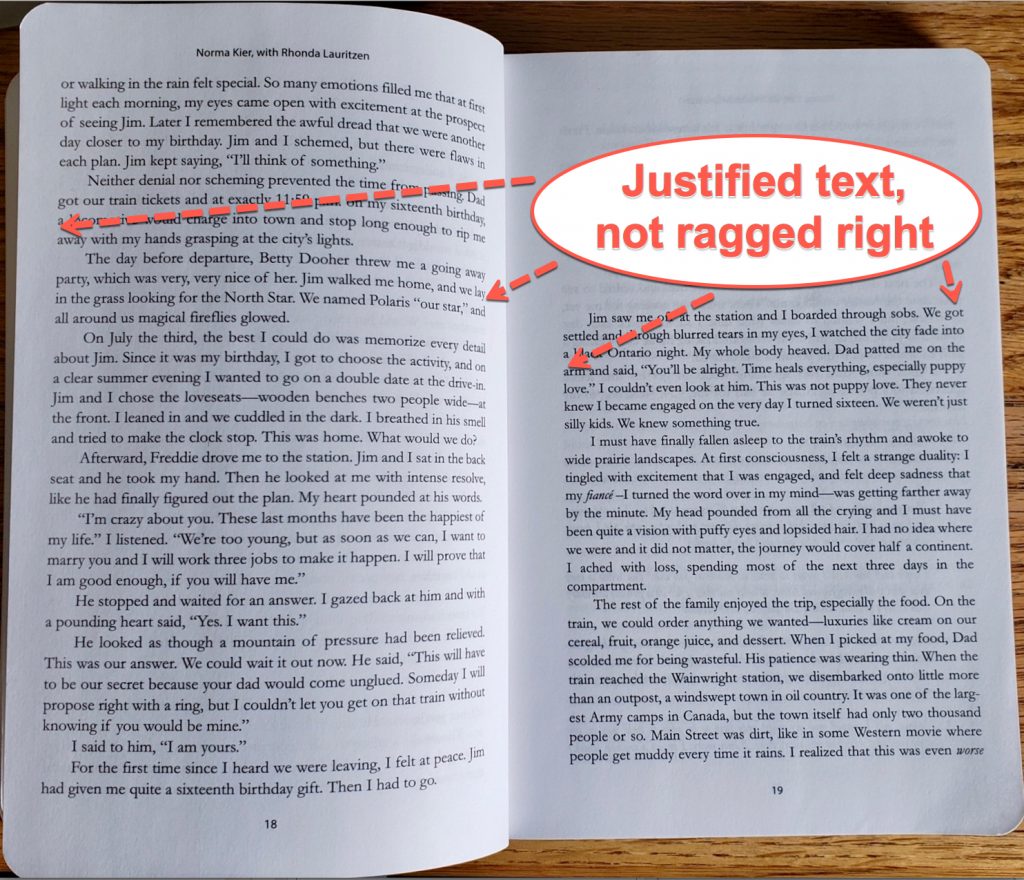
- Justified text: When you choose alignment that is justified, this alignment, there will be some hyphenation. If this leaves you with more hyphens than you like, simply override them manually. In other words, your book should not have a “ragged right.”
- Line spacing that breathes: My personal preference is to set up the line spacing at “multiple” 1.1.” Single spacing is too tight for comfortable reading, while anything more will increase your page count (and print cost). You have some latitude here however. As a practical note, for for read-aloud sessions with clients, I do double spacing. (What’s a read-aloud session? I’m so glad you asked. Here is my article about why I NEVER skip this step.)
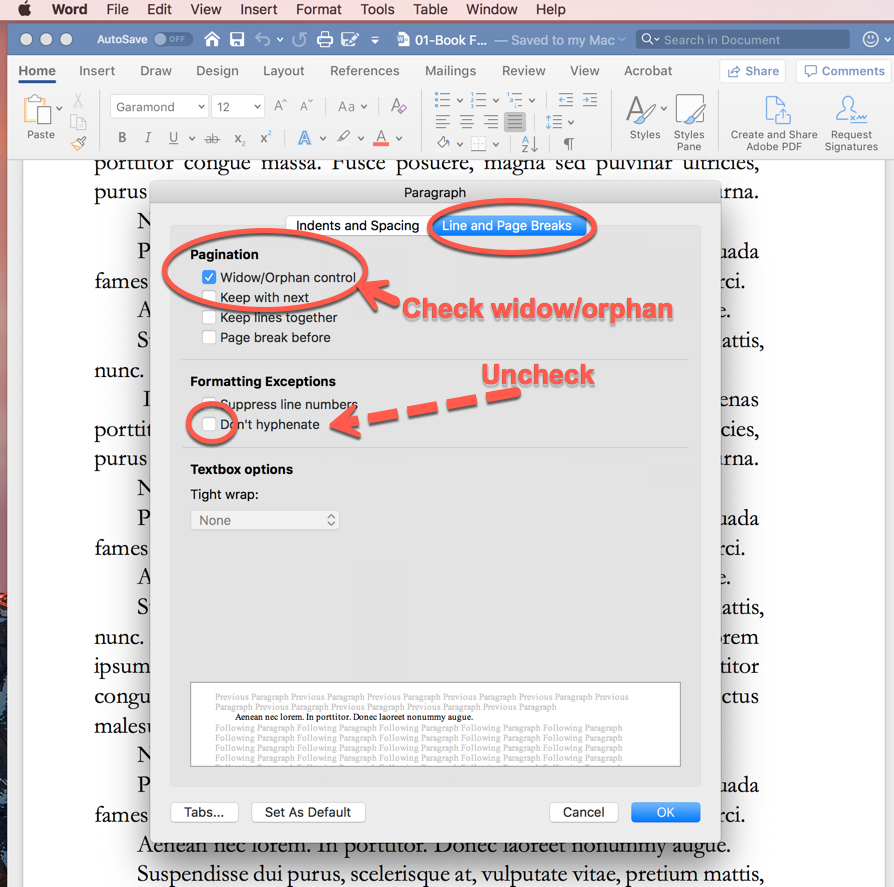
- Do not leave widows or orphans: These are single lines at the bottom or top of pages. See screen shot below.
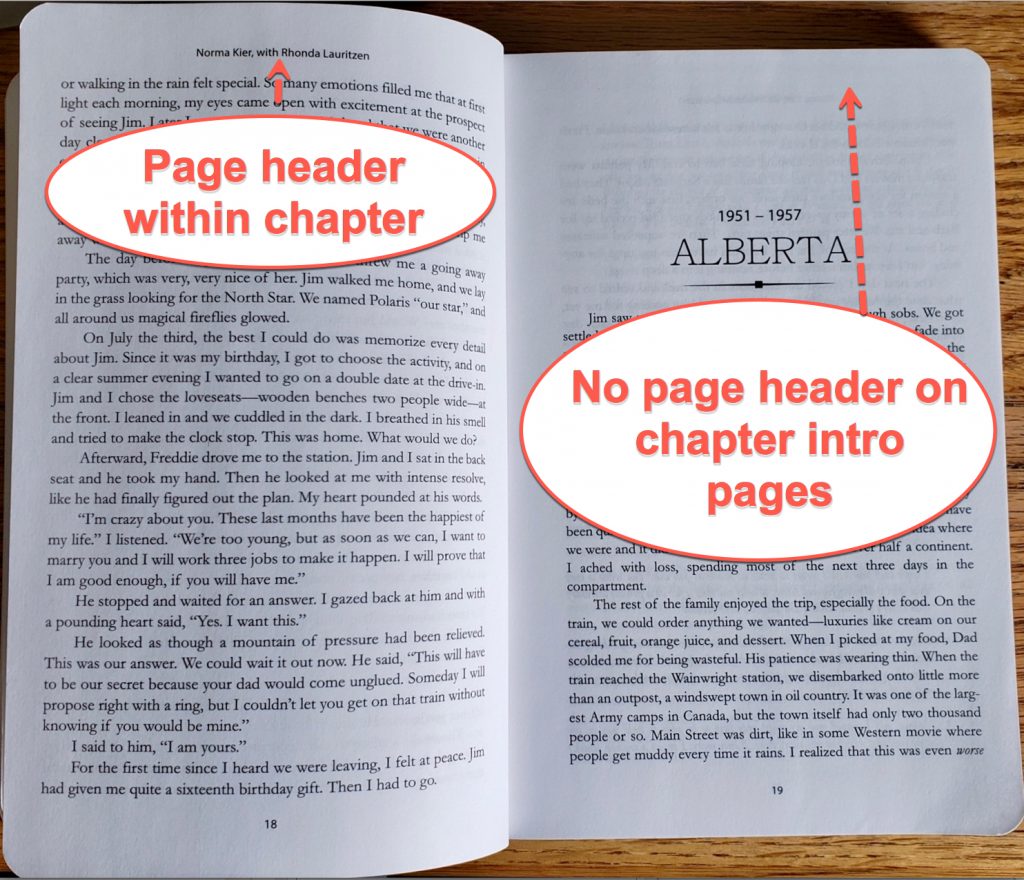
- No page headers on new chapters: Omit these on the first page of chapters, as well as on title pages and the like. You can remove them by setting up each chapter as its own section. It’s kind of a hassle in Microsoft Word. Sorry.
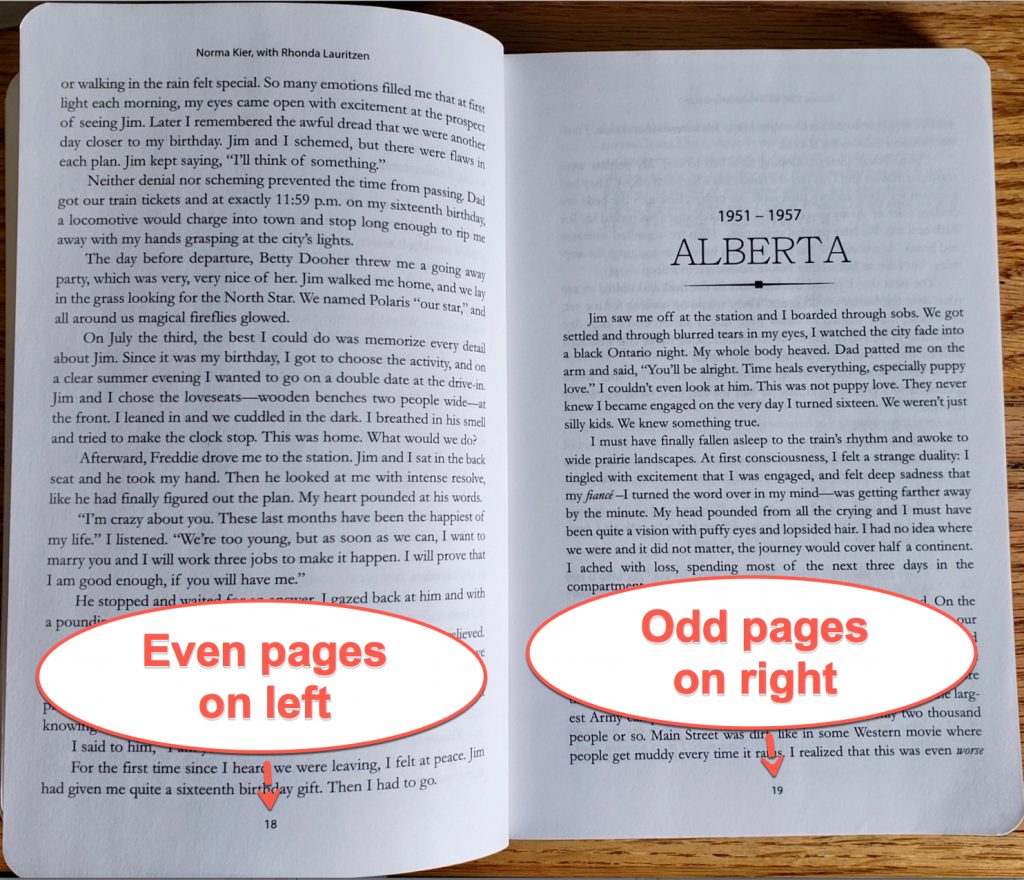
- Even/odd page number positioning. Even-numbered pages are always on the left, and odd numbers go on the right.
- Margins: Make sure there is at least 0.75″ to 1″ all around.
- Gutter: The gutter (middle margin) should be 0.875″ or more.
- Use a serif font for print: By “serif font,” I mean something like Times New Roman, and not “sans serif” such as Helvetica or Arial. And for the love of Pete, don’t get fancy with the font. Look for something modern and clean, without calling attention.
- Print a proof and assemble it exactly as it will lay. This can take patience on a home printer, but it helps if your printer does double-sided pages without jamming. You want your two-page spreads to face each other so it opens like a book.
- High-res photos, optimized for print: Photos should be scanned at high-resolution, and optimized for print. Consult your printer for specifications.
- Use this checklist: Thumb through the whole book, page-by-page to make sure everything is right, and refer to this list. Fix changes, and print the whole thing again. When you package your PDF for the printer, print that document again. Yes, you will chew up some trees.
- Remember – the best layouts are imperceptible: You want readers to sense that the book is pleasing and professional, without having the layout calling attention.

Best practice – don’t embed your photos inline if your book is paperback size
I know, you really want to include your photos inline where they should go in terms of relevance to the story. “It will mean more to the reader,” you say. And also, “This way makes logical sense” My response is that, “You’re not wrong.”
But…
There are some reasons to avoid embedding photos throughout your chapters.
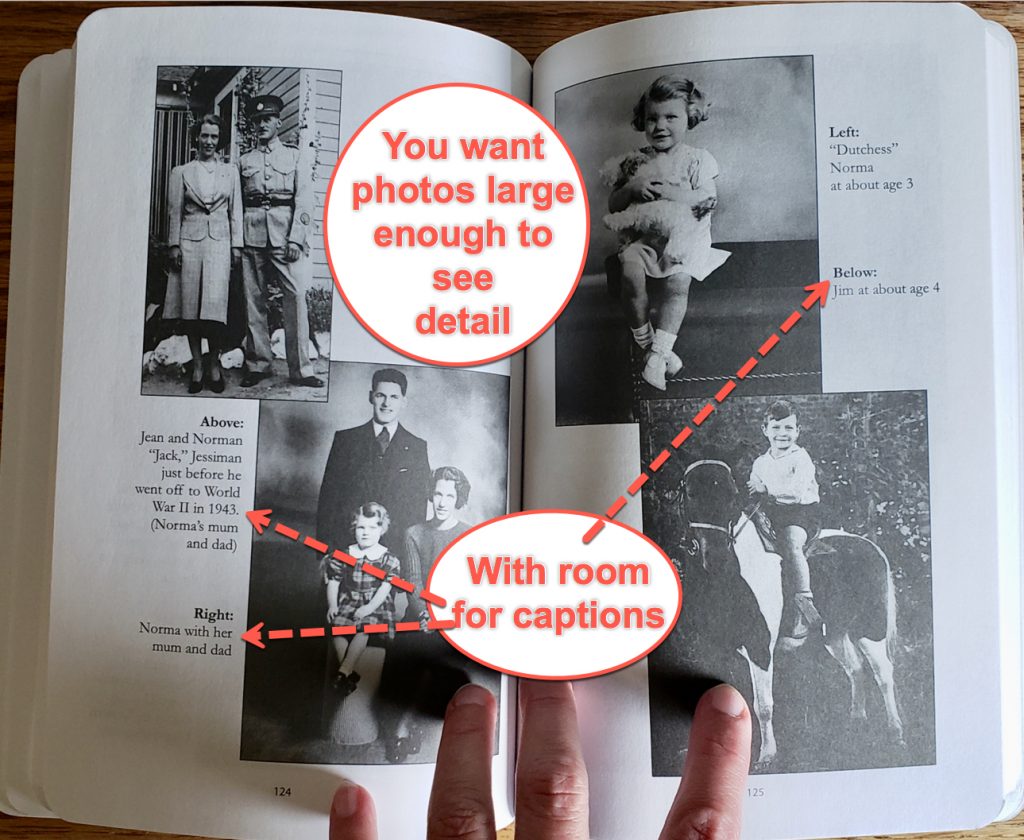
First, there just is not enough room. Let’s say your book is a standard size “trade paperback” like 6 inch by 9 inch (6×9) or 5.5 inch by 8.25 inch. Below is a 6 x 9 book with the photos inserted into the middle of the book. You can see how little room there would be for text to wrap around the photos. Otherwise, the photos will be too small or else there will only be an inch or so for the text block.
Trust me, I learned this one the hard way. I laid out a book myself with the photos inline. Then I saw the proof and realized it was a disaster. All the time I spent putting photos where I wanted them was wasted and I had to do it over again.
It’s important to understand that layouts look bigger on the screen than they really are when printed. My hand in in the picture below for scale.
The next reason is that inserting and dealing with photos and especially the captions can be a big fat pain. Word just really is not set up to do this well. Hence, trying to get your layout to look nice with the text around it will leave you frustrated and you’ll end up fixing it, then fixing it again.
Group your photos into one section instead
Instead, group all your photos into one or two sections in the book. It just saves a lot of labor and aggravation to group photos together in the middle or at the end.
Oh, and do this after the writing/editing process is DONE, not while you’re still going back and forth. Editing the copy will change your pagination and mess up your photo layouts. So, before you start inserting photos or other graphics, it’s critical to lock down the copy edits to only minor changes of a word here and there.
Writing a book template for an interior layout in Microsoft Word
Okay, if you have decided to do the layout yourself, I have a template for you to play with in Microsoft Word. I know, I have been railing against Word during this whole article and I still am. However, this template can be useful to plunk your manuscript into and get a feel for how many pages it will be and how it will look in a 6 x 9 format. This template can even be helpful for printing a draft that others can review.
Hence, I have created a template for a life story that was professionally printed. It has all the settings pre-created and you can copy and paste your chapters.
As I mentioned, what’s fun about this is you can quickly see length and how it all works using these settings, using familiar software.
Keep in mind that I used this actual layout and exported it to a local printer for 1,000 copies, so it can be done. However before you go down this path, make sure you can export a Microsoft Word layout to a PDF that will work for your printing company. One of the tricky steps is exporting a PDF from Word that keeps a 6 inch by 9 inch layout. Word and Adobe Acrobat just don’t work well together for this depending on your version. I’ve put all the settings in place, but have found that sometimes it works and sometimes it does not. It SHOULD have worked, but didn’t.
So, even if you don’t end up using this Microsoft Word template for your book product, using it for work-in-process can help you see how the settings work together.
Book template

Get my Microsoft Word book layout template with all the settings I mentioned in this article. This will save you a lot of time!
Writing a book template #2: my method for making your story compelling
This is already a long article so I am going to summarize and give you options for further learning, along with a template you can download or order it on Amazon. The short version is that one of my favorite topics is how to storyboard true stories, memoirs, biographies, and fiction. This template works on full books or short vignettes, and it always sparks creativity. It’s fun, and will help make sure your story hits emotional beats that satisfy readers. My “writing a book template” template uses sticky notes for an iterative process that helps you let go of perfectionism. Scroll down for the input form to get my storyboard template.
Explore storyboarding further:
- If you’d like to read more about the book template works, click over to this article: How to Storyboard
- Here’s a video to see how a story can fit within the storyboard template: How to Storyboard Life Stories
- If you want to download the printable storyboard template, you can get it with the form below. It’s free!
- Happy storyboarding!
Printable Storyboard Template

Storyboard any book, memoir, biography, or family history tale with our free printable template. It just might save your story.

Rhonda Lauritzen is the founder and an author at Evalogue.Life – Tell Your Story. Rhonda lives to hear and write about people’s lives. She believes that when you tell your story, it changes the ending. She and her husband Milan restored an 1890 Victorian in Ogden. She especially enjoys unplugging in nature. She recently completed the history of the Old Fort where Pioneer Park now sits, a project commissioned by Salt Lake City. Check out her books: How to Storyboard, and Every Essential Element. She was also the writing coach of bestselling author, Rob A. Gentile, who wrote Quarks of Light, A Near-Death Experience: What I Saw That Opened My Heart

I enjoyed the article; I will be putting the information to use when I get to the point where I begin to write my book. Thank you so much.
Many thanks, Rhonda. A very timely article on Writing a Book Template. So much appreciated as I recently printed an unedited copy of one-half of my autobiography (1941-1976). Can now redraft with your suggestions.
Have been visiting relatives and entertaining others the last month. Am also redesigning my workspace in light of buying a new computer. Plan to get back on writing.
Although you may not see me on your weekly zoom lessons, know I value watching later on YouTube.
Ev Charette
Rochester, NY
Ev – thanks for your kind note here and for your ongoing support of our training. How exciting that you are getting to the point of editing so much of your autobiography! I’m proud of your hard work and all that you are accomplishing. You are leaving a valuable legacy and one that will be fun for your family to read. Good luck with your office redesign too.
Thank you Ronda. I received the storyboard. I am now transcribing the talks from my wife Karen’s funeral held December 28, 2019. I am studying the layout suggestions you provided in your email.
They are very helpful.
Keith Snarr
Murray, Utah
Keith – thanks for the update! Glad you got the storyboard and that you are off and running. Please reach out along the way whenever you run into a snag. You are doing important work.
Thank you for this information. I am now getting started on my late wife’s story. Your classes and emailed data are helping and inspiring me immensely.
I will keep in touch as I make progress.
Keith Snarr,
Murray, Utah
Keith, thanks so much for your comment! It means the world to us to hear from readers and people who attend our classes. Best wishes with your late wife’s story – that is an important labor of love and a powerful way to honor her life. It is healing and therapeutic and beautiful. Please do keep in touch. By the way, I remember your name from email, and want you to know that I mailed a storyboard to you earlier in the week and you should get it any time. 🙂